
Add SSL & HTTPS: Secure Your WordPress Website
Welcome to our step-by-step guide on how to add SSL & HTTPS to your WordPress website. In today’s digital landscape, online security is of utmost importance. By implementing SSL (Secure Sockets Layer) and enabling HTTPS (Hypertext Transfer Protocol Secure), you can ensure a safe and encrypted connection between your website and its visitors.
Read Our Blog on Why is SSL Certificate Necessary?
Guide to Add SSL & HTTPS
In this Step-by-Step tutorial, we’ll walk you through the process, helping you protect your website and gain the trust of your audience.
Step 1: Choose a Reliable SSL Certificate Provider
Before diving into the technical steps, it’s crucial to select a reputable SSL certificate provider. Look for well-known companies such as Let’s Encrypt, Comodo, or GlobalSign. Consider factors like certificate type (single, wildcard, or extended validation), cost, and customer support. A trusted SSL certificate provider will help ensure seamless integration into your WordPress website.
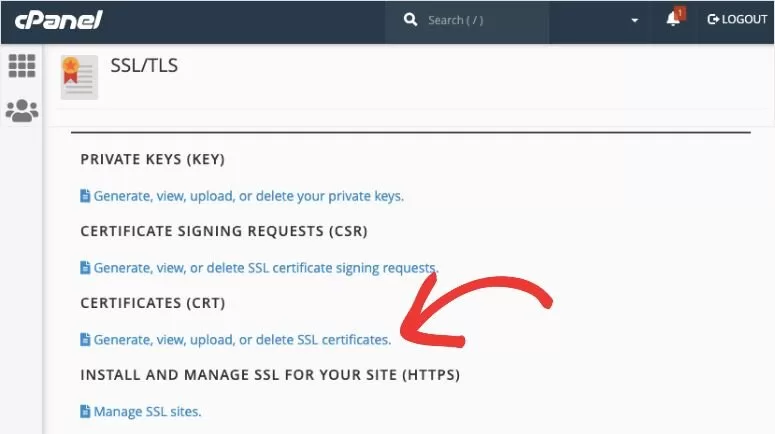
Step 2: Verify and Activate SSL on Your Web Hosting Account
Once you’ve obtained an SSL certificate, it’s time to activate it on your web hosting account. Log in to your hosting provider’s control panel and locate the SSL/TLS section. Follow the instructions provided by your hosting company to verify and activate the SSL certificate for your domain. Some hosts offer automated setups, making the process even more straightforward.
Step 3: Install and Configure the Really Simple SSL Plugin
To simplify the SSL integration process, we recommend using the “Really Simple SSL” plugin. Install and activate the plugin from the WordPress dashboard. Once activated, navigate to the plugin’s settings page. The plugin will automatically detect your SSL certificate and configure your WordPress website to use HTTPS. It will also handle mixed content issues, ensuring all resources are loaded securely.
Step 4: Update Your WordPress URL Settings
After activating the plugin, it’s essential to update your WordPress URL settings. Go to “Settings” in the WordPress dashboard and click on “General.” Update both the “WordPress Address (URL)” and “Site Address (URL)” to include “https://” instead of “http://”. Save the changes. This step ensures that your WordPress website operates entirely over HTTPS.
Step 5: Update Internal Links and Media Files
Next, it’s time to update internal links and media files within your website. The Really Simple SSL plugin has a feature called “Mixed Content Fixer” that automatically converts HTTP links to HTTPS. However, it’s recommended to manually review your website’s content and update any internal links to ensure they are HTTPS compliant. Additionally, update any embedded media files or external resources to their HTTPS counterparts.
Step 6: Implement a 301 Redirect
To maintain your website’s SEO rankings and ensure a seamless transition to HTTPS, set up a 301 redirect. This redirect will automatically redirect visitors from the HTTP version of your site to the HTTPS version.
Alternatively, you can use a plugin like “Simple 301 Redirects By BetterLinks” to handle the redirect for you. Verify that the redirect is functioning correctly by accessing your website using the HTTP version and ensuring it redirects to HTTPS.
Step 7: Update External Services and Google Analytics
If your website integrates with external services, such as payment gateways or APIs, ensure that you update the URLs to use HTTPS. Additionally, if you use Google Analytics or any other tracking tools, update the tracking code to reflect the new HTTPS URL to avoid any disruptions in data collection and analysis.
Step 8: Test and Verify SSL Implementation
After completing Step 7, it’s crucial to test and verify the SSL implementation on your WordPress website. Use online SSL checking tools or browser extensions to ensure that your SSL certificate is installed correctly and that your website is loading securely over HTTPS. Verify that there are no mixed content warnings or errors and that all resources, including images, scripts, and stylesheets, are being loaded securely.

Step 9: Update Your Sitemap and Submit it to Search Engines
To ensure that search engines recognize your website’s migration to HTTPS, update your XML sitemap and resubmit it to search engines like Google and Bing. Most SEO plugins for WordPress, such as Yoast SEO or All in One SEO Pack, provide options to generate and manage your sitemap. After updating your sitemap, resubmit it through the respective search engine’s webmaster tools to expedite the indexing process.
Step 10: Monitor and Maintain SSL Security
Congratulations! You’ve successfully added SSL & HTTPS to your WordPress website. However, it’s important to remember that SSL security requires ongoing monitoring and maintenance. Regularly check for any SSL certificate expiration dates and renew them in a timely manner. Stay updated with the latest security practices and keep your plugins, themes, and WordPress core up to date to prevent vulnerabilities.
Boost security without compromising SEO
Switching your WordPress website to HTTPS may result in a temporary rankings dip due to search engine adjustments and link updates. However, by properly implementing SSL & HTTPS, updating internal and external links, submitting an updated sitemap, and monitoring your website’s performance, you can minimize the impact and ensure a smooth transition.
Remember, the enhanced security and user trust provided by SSL & HTTPS are valuable long-term benefits that outweigh any temporary fluctuations in rankings.
Securing your WordPress website with SSL & HTTPS
Adding SSL & HTTPS to your WordPress Site is essential for maintaining trust, protecting user data, and improving search engine rankings. By following this creative step-by-step guide, you’ve learned how to add SSL & HTTPS to your WordPress website effectively.
If you have any doubts reach out to F60 Host
Remember to choose a reliable SSL certificate provider, configure the Really Simple SSL plugin, update your URL settings, and implement redirects and updates throughout your website. Regularly monitor and maintain your SSL security to ensure a safe and encrypted connection for your website visitors. With SSL & HTTPS in place, you can confidently provide a secure browsing experience and establish your website as a trusted online destination.