
5 Steps to Securely Transfer G Suite Data

How To Transfer G Suite Data Securely
A G Suite administrator must protect the account, save the data of the departing employee, and move data to another G Suite account. A five-step strategy that has worked for various organizations is outlined below.
1. Secure access:-
- To begin, delete all data from the account’s mobile devices. Log in to the G Suite admin panel at https://admin.google.com with a G Suite administrator account, click Users, choose the user’s name, and then select Account. The mobile devices associated with the account may be found at the conclusion of the account section. Wipe this account to delete the data on the organization’s device, or Wipe this device to delete all data from the device. This procedure should be repeated for each connected device.
b. Next, update the password for the user. Keep a record of your new password. It’ll come in
handy later.
c. Choose Reset sign-in cookies to require the user to re-login all devices
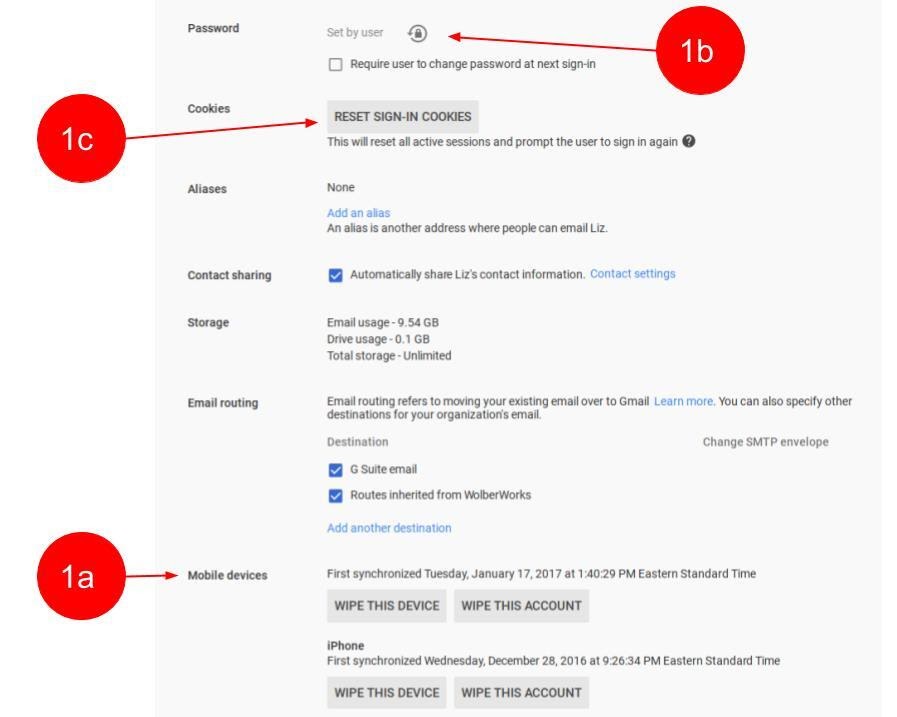
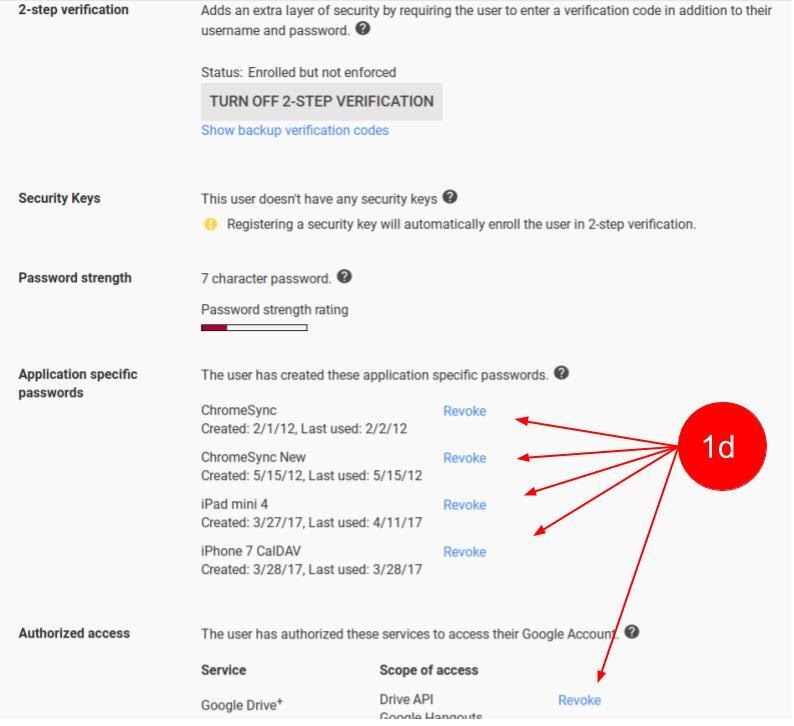
d. Return to the user’s main settings page, then scroll down to the Security section (you may need to pick Show more). All application-specific passwords and all mentioned approved access items should be revoked. At this time, I also recommend turning off two-factor authentication.
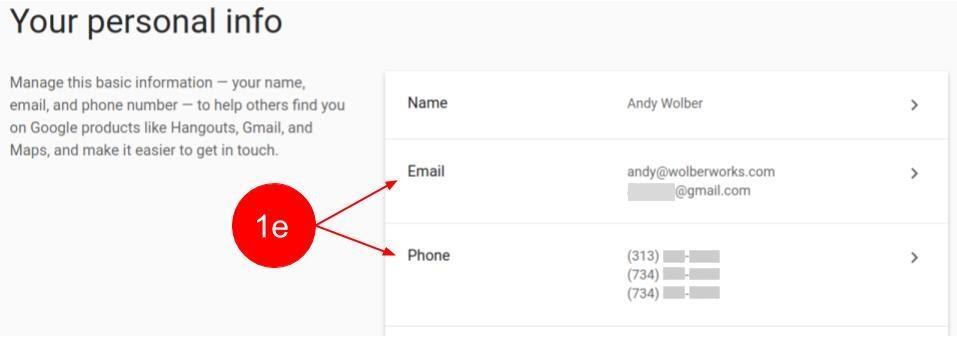
e. Next, log into the account of the former employee and delete any recovery phone numbers or email addresses linked with the account. I usually start with a new incognito browser window, then navigate to https://myaccount.google.com and log in as the user. Remove any personal, external email addresses and phone numbers linked with the account by selecting Your personal information from the home screen.
You now have ownership of the former employee’s account, and the former employee’s access to account data has been disabled.
2. Save data:-
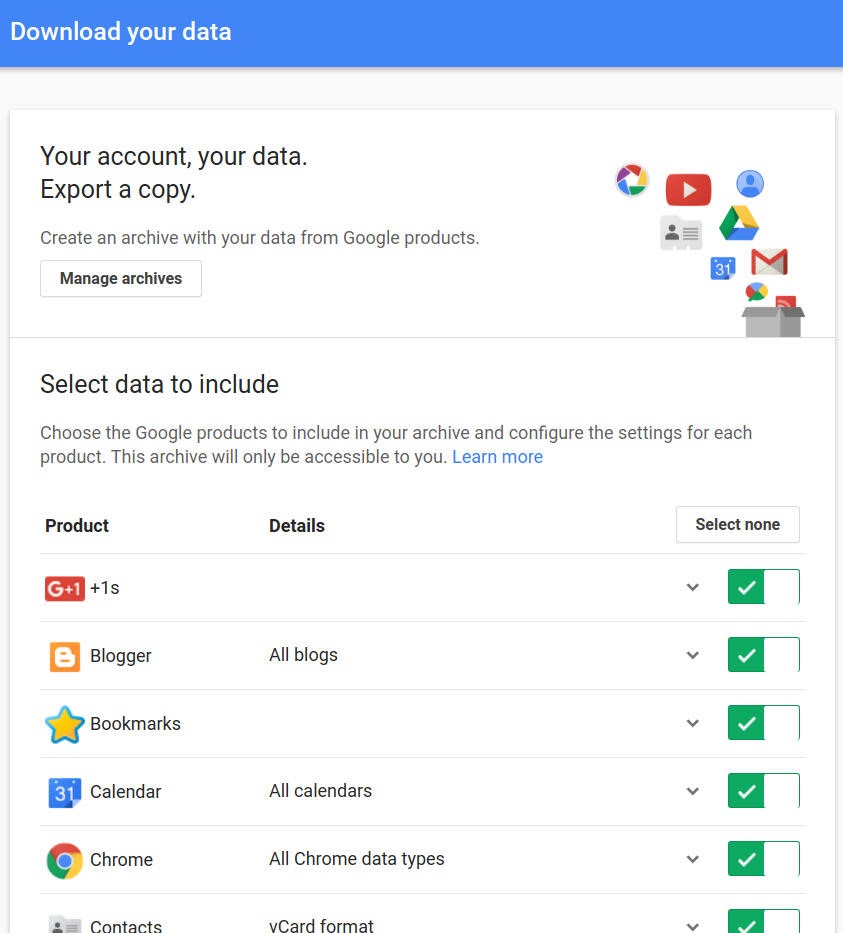
To preserve all data associated with the account, use Google Takeout. Go to https://google.com/takeout in a new incognito browser window and log in with the former employee’s account. Choose Next after selecting the data you want to export. Leave everything selected to export all data. If you have a lot of data, however, you might wish to raise the maximum exported file segment size. The default storage capacity is 2GB, with capacities up to 50GB available. Select the option to create an archive.
Google will send an email to the former employee’s account once the archive has been generated. You can check your email and then download the archive file by clicking the link in the email (s). Keep these files in a safe place. These files are preserved in archival-quality storage and kept with the employee’s human resource records in certain businesses.
You now have a copy of the data from the G Suite account of the former employee.
3. Transfer data:-
Log in as a G Suite administrator to move mail and files.
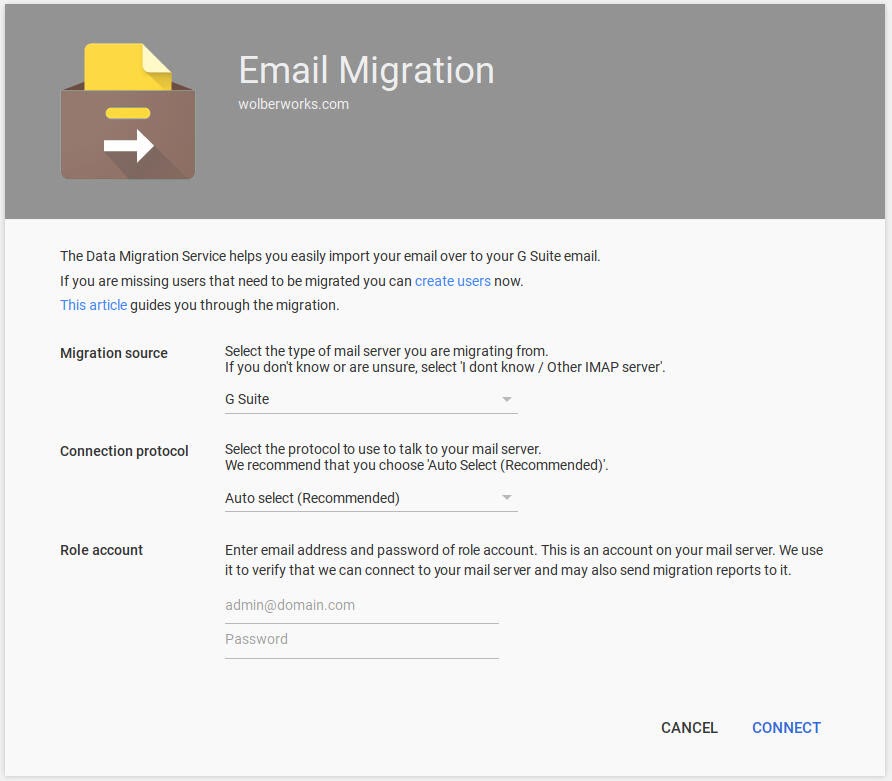
A super administrator can transfer email from one G Suite account to another using the G Suite data migration function. Select Data Migration and Email from the G Suite admin panel (https://admin.google.com). Select G Suite as the migration source, and then enter the super administrator login credentials. (If you’ve enabled two-step authentication for your super administrator account–which you should!–you’ll need to create an application-specific password.) Next, select your source and destination accounts for the migration.
An administrator can also change the owner of a file. Choose Apps > G Suite > Drive and Docs > Transfer ownership from the admin panel. Then fill in the account owner information for both the source and destination accounts. (Moving files from the departing employee’s Google Drive to a shared Team Drive is another option.) When a file is transferred to a Team Drive, the owner of the file shifts from the creator to the team. Even if the original file owner’s account is deactivated, these files remain.)
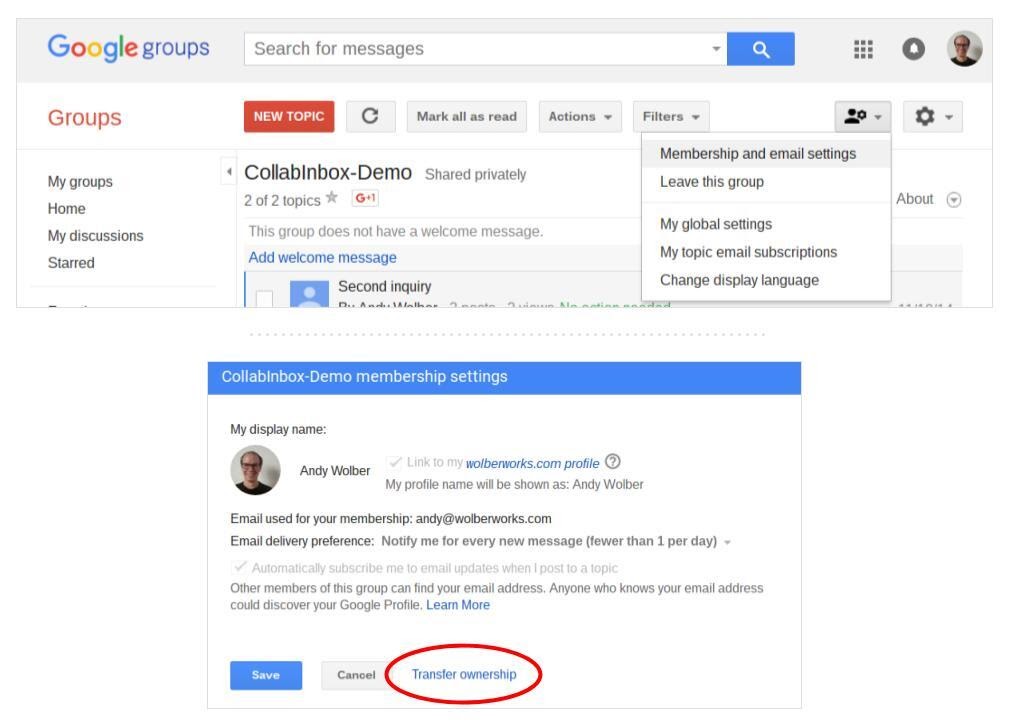
Add another account as the owner of Google Groups and/or Sites to transfer them.
Log in to https://groups.google.com using the employee’s account, find a group, then choose the group settings icon, then Membership and email settings, then Transfer ownership. The owner can then be changed to another member of the group.
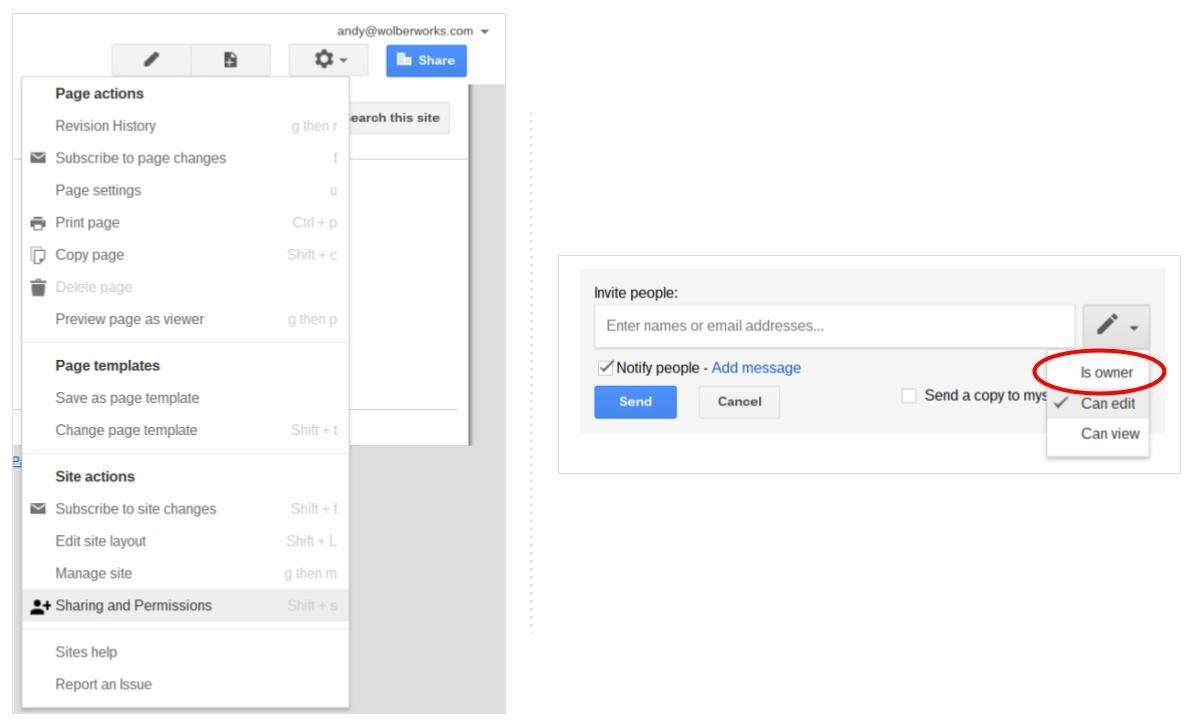
For Classic Google Sites, go to https://sites.google.com, pick a site, then settings, sharing and permissions, and then ask another person in the company to be an owner of the site.
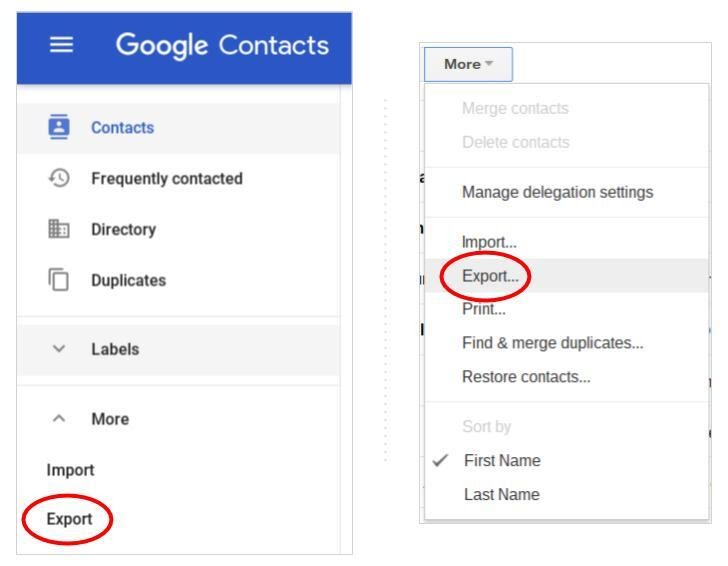
Export the data first, then import it into another account if you wish to move contacts or calendars.
To export contacts, go to https://contacts.google.com/ > (left menu) More > Export as the user. To export an old version of Google Contacts, go to the More menu, then Export. Go to https://contacts.google.com/ > (left menu) More > Import, then choose the exported file to import contacts into another account.
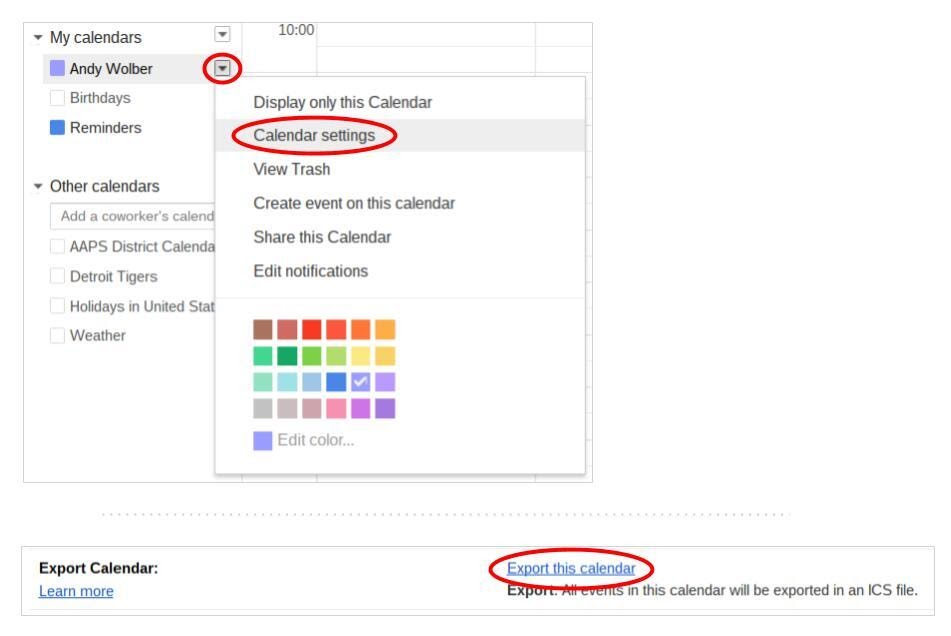
Log in as the user and navigate to https://calendar.google.com in a browser to export calendar events. Select the arrow to the right of a calendar from the list of calendars in the My calendars area on the left of the page, then click Calendar settings, then Export this calendar. Save the document.
Go to https://calendar.google.com, pick the sprocket (upper right) for settings, choose Calendars, then Import calendars to add the events to any existing calendar.
4. Delete account:-
You may now remove the account of the former employee. Log in to the admin panel, go to Users, then to the right of the user, pick the three-vertical dot menu, and select Delete.
5. Add address as alias:-
You may wish to keep the email address active as an alias if the former employee’s account was used to connect into any websites or services. Because each email received to the address will show in an active account, you will be able to regain the login to those sites much more quickly.
To create an alias, go to the G Suite admin panel, pick Users, then select a user, Accounts, then Alias, then Add an alias. (Note that one of the first photographs in this article shows the Alias.) Include the email address of the former employee. If you’ve just deleted an account, you might want to wait until it’s completely purged before adding it as an alias.
I’ve used this method to migrate G Suite account info multiple times. I always take the necessary precautions to protect account access and export account data, but I mostly transfer files. Clients frequently refuse to switch their contacts or calendars to other accounts.