
Robots.txt: The Ultimate Guide & Why It Matters
What Is Robots.txt?
One of the main techniques for telling a search engine where it can and cannot go on your website is through the robots.txt file.
The basic function it provides is supported by all major search engines, but some of them also respond to extra rules, which might be useful.
This is what a robots.txt file looks like:

Robots.txt files may appear complex at first, but the syntax (computer language) is actually quite simple. Later, we’ll discuss those specific details.
Warning!
Before you begin, make sure you have read and understand the entirety of this tutorial. Any errors you make in your robots.txt file might do major harm to your website.
What does the robots.txt file do?
By crawling sites, search engines find and index the web. They find and follow links as they crawl. They travel from site A to site B to site C and so on using this method. However, a search engine will first check the robots.txt file on any website it has never visited before before visiting any page there. They may then see which URLs on that website they are permitted to access (as well as which ones they are not).
Why Is Robots.txt Important?
A robots.txt file is not often used for websites.
That’s because Google can usually identify and index all of your website’s key pages.
Additionally, they will automatically exclude duplicate or unimportant pages from their indexing.
However, there are three basic reasons for using a robots.txt file.
Enhance Crawl Budget
The total amount of pages Google will crawl from your website each time is known as the “crawl budget.” Depending on the size, health, and backlinks of your website, the number may change.
Crawl budget is crucial because if the number of pages on your site exceeds the crawl budget, some of those pages won’t be indexed.
Additionally, pages that are not indexed won’t be ranked for anything.
Googlebot (Google’s web crawler) may focus more of your crawl budget on important pages by banning superfluous pages with robots.txt.
Block Duplicate & Non-Public Pages
Not every page on your website needs to rank, therefore you don’t have to let search engines scan them all.
Staging sites, internal search results pages, duplicate websites, and login pages are a few examples.
For instance, WordPress automatically blocks all crawlers from accessing /wp-admin/.
It is necessary for these pages to exist, but it is not necessary for search engines to index and find them. This is the ideal scenario for using robots.txt to prevent crawlers and bots from accessing these sites.
Disable Resource Indexing:
There are instances when you’ll want Google to ignore search results for items like PDFs, videos, and photos.
Perhaps you want to keep certain materials secret or you want Google to concentrate on more significant information.
In such scenario, the easiest option to stop them from being indexed is to use robots.txt.
How Do Robots.txt Files Work?
Robots.txt files provide search engine crawlers with information on which URLs they can and cannot crawl.
Search engines have two main jobs:
- Crawling the web to discover content
- Indexing content so it can be shown to searchers looking for information.
Search engine crawlers find and follow links as they crawl. They travel through billions of connections and webpages to get from site A to site B to site C using this technique.
A crawler will seek for a robots.txt file as soon as it visits any website.
Before doing anything further, it will read the file if it discovers one.
The syntax is very simple to understand.
By declaring their user-agent (the search engine crawler) and then giving instructions, you may give rules to crawlers (the rules).
The wildcard symbol (*), which may be used to apply directives to any user-agent, is also available. Hence, rather than referring to a particular bot, the rule is applicable to all bots.
Where to Look for a Robots.txt File?
Like any other file on your website, the robots.txt file is stored on your server.
Any website’s robots.txt file may be seen by appending /robots.txt to the homepage’s complete URL, as in the example below.
https://f60host.com/robots.txt
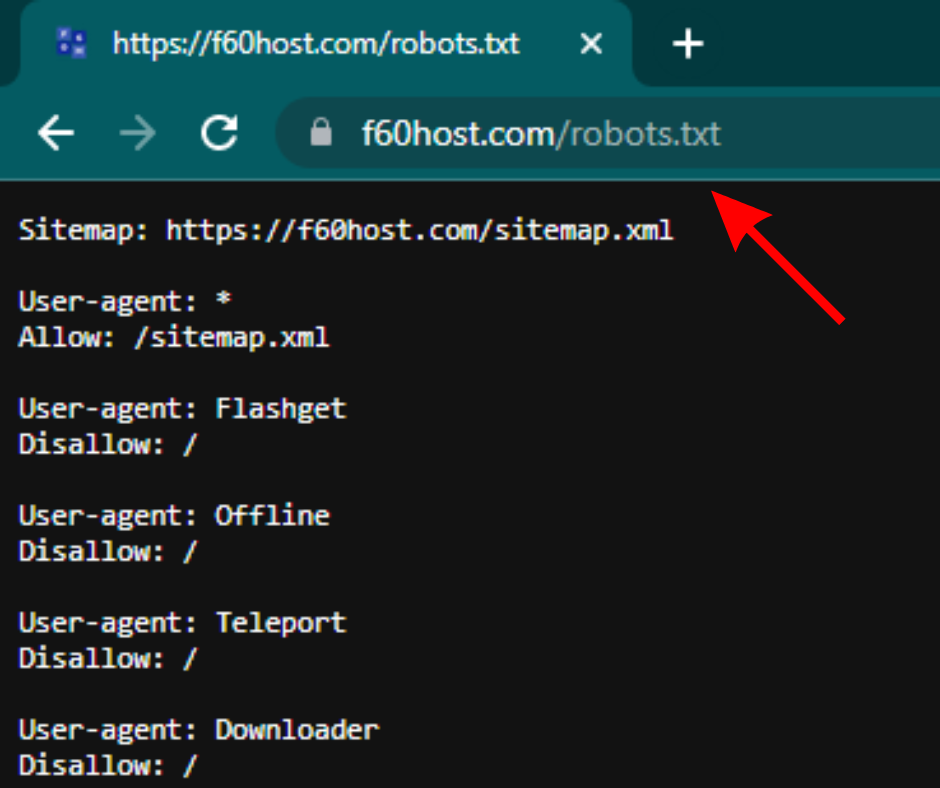
Note: Your domain’s root should always have a robots.txt file. Therefore, the robots.txt file for the website www.example.com is located at www.example.com/robots.txt. Crawlers will presume you don’t have one if you are everywhere else.
Let’s look at the syntax of a robots.txt file before learning how to make one
Robots.txt syntax
Each set of instructions in a robots.txt file begins with a line with the user-agent string. The name of the particular spider it addresses is the “user-agent.”
Using a wildcard for the user-agent, you may either have one block for all search engines or specific blocks for specific search engines. The block with the closest name match will always be chosen by a search engine spider.
A basic block might appear as follows:
******
The User-Agent Directive
The “user-agent,” which identifies the crawler it addresses, appears on the first line of each set of directives.
So, for instance, if you wish to instruct Googlebot not to crawl your WordPress admin page, your instruction would begin with:
User-agent: *#*
Disallow: /wp-admin/
Remember that most search engines have a number of crawlers. They employ many crawlers for their standard index, photos, videos, etc.
The most specialized directive block that can be found by search engines is always chosen.
Say you have three different sets of directives: one for *, one for Googlebot, and one for Googlebot-Image.
The Googlebot-News user agent will crawl your website in accordance with Googlebot’s instructions.
But the Googlebot-Image user agent will adhere to the more detailed Googlebot-Image directives.
The Disallow Directive
The “Disallow” line appears on any block of directives as the second line. You can set several forbid directives to limit the crawler’s access to different areas of your website. An empty “Disallow” line indicates that you are not blocking anything, enabling crawlers to access any part of your website.
On the other hand, your block might appear like follows if you intended to prevent all search engines from indexing your website:
User-agent: *
Disallow: /
There is no case distinction for directives like “Allow” and “Disallow,” so you may choose whether to capitalize them or not. The values contained in each directive, however, are.
For instance, /photo/ and /Photo/ are not the same thing.
However, “Allow” and “Disallow” directives are frequently capitalized since it makes the file simpler to understand for humans.
The Allow Directive
An allow directive was mentioned quite early on, even though it wasn’t in the original “specification.” It permits straightforward and easily understandable directions like this: It appears that the majority of search engines comprehend it.
User-agent: Googlebot
Disallow: /blog
Allow: /blog/example-post
Without an allow directive, the only other option would have been to individually restrict each and every file in the wp-admin folder.
Steps for Creating a Robots.txt File
Making a robots.txt file is simple if you don’t already have one. You can make one yourself or use a robots.txt generator tool.
To generate a robots.txt file, you may use practically any text editor. For instance, legitimate robots.txt files may be created using Notepad, TextEdit, vi, and emacs. Use a spreadsheet instead of a word processor; word processors sometimes contain unusual characters like curly quotes, which might cause issues for crawlers. If prompted in the save file window, make sure to save the file using UTF-8 encoding.
Here’s how to make a robots.txt file in four easy steps:
- Create a file called robots.txt.
- Add rules to the robots.txt file
- Upload the robots.txt file to your site
- Test the robots.txt file
1. Create a file called robots.txt
To begin, open a.txt file with any text editor or web browser.
Note: Avoid using a word processor since they frequently store files in a specific format that can insert random characters.
Then, name the file robots.txt. It must be titled robots.txt in order to function.
You may now begin typing commands.
2. Add Directives to the Robots.txt File
A robots.txt file has one or more sets of commands, each of which contains many lines of instructions..
Each group begins with a “User-agent” and has the following information:
- Who the group is for (the user-agent)
- Which files (or files) can the agent access?
- Which files (pages) or files cannot the agent access?
- A sitemap (optional) to inform search engines about the sites and files you consider significant.
Lines that do not match any of these commands are ignored by crawlers. Save your robots.txt file. Remember, it must be named robots.txt.
Please note that crawlers read from top to bottom and match the first and most explicit set of regulations. Begin your robots.txt file with specific user agents, then go on to the more generic wildcard (*) that matches all crawlers.
3. Upload the Robots.txt File
After saving your robots.txt file to your computer, upload it to your site and allow search engines to crawl it. Unfortunately, no common tool exists to assist with this phase. The robots.txt file must be uploaded depending on your site’s file structure and web hosting.
For assistance with uploading your robots.txt file, go online or contact your hosting provider. For example, to get detailed instructions, search for “upload robots.txt file to WordPress.”
Try to find out whether anyone can view the robots.txt file and if Google can read it once you submit it.
This is how.
4. Test Your Robots.txt
First, check if your robots.txt file is publicly available (i.e., if it got uploaded correctly).
Search for your robots.txt file in a private window of your browser.
For example, https://f60host.com/robots.txt
You’re ready to test the markup if you see your robots.txt file with the material you inserted (HTML code).
Google provides two solutions for robots.txt markup testing:
- The Search Console robots.txt Tester
- The open source robots.txt library from Google (Advanced)
Because the second technique is more suited to sophisticated developers, let’s run your robots.txt file using Search Console.
Note: To test your robots.txt file, you must first create a Search Console account.
Use Separate Robots.txt Files for Different Subdomains
Crawling activity is solely controlled by robots.txt files on the subdomain where they are located. A second robots.txt file is required if you wish to control crawling on a different subdomain. So, if your main site is at domain.com and your blog is at blog.domain.com, you’ll need two robots.txt files. One for the root directory of your main domain and one for the root directory of your blog.
Check out more educational articles on F60 Host. We also have blogs on What is canonical URLs.
Conclusion
Robot.txt files are critical to the effective operation of your website. It is used to inform search engines on what should and should not be indexed, making it a necessary tool for your website. Google Search Console is another essential tool for creating a powerful website. Read everything about it on our Google Search Console blog.
I hope you enjoyed reading this post. Follow F60 Host on Twitter for updates.