How to Set Up an eCommerce Website Using WordPress
eCommerce Website using WordPress
So you want to Set Up an eCommerce Website using WordPress to help you do it. We understand – after all, WordPress powers 30% of all websites on the internet today, and for good reason. It’s a robust, scalable platform that’s also completely free!
However, you should not immediately turn to WordPress without first examining other possibilities. Although WordPress is a fantastic platform, it is not for everyone. If you’re only trying to sell a few things as a side business, for example, utilising WordPress is like riding the bus instead of an Uber: time-consuming, expensive, and useless.
9 Steps to Set Up an eCommerce Website Using WordPress
Step 1: Score the perfect domain name
Your domain name is essentially the address for your website. It’s the section of your URL following the ‘www.’ For example, ours is ‘F60host.com.’
Sites like F60Host allow you to purchase a domain name. If you’re lucky, the one you want will be free and selling for the typical cheap price. If you’re not so lucky, your favourite domain name may be unavailable or only available for resale at a significantly higher price — potentially thousands of dollars. However, this is just for the first year; after that, even the most expensive domain names will renew at the usual fee ($8–$20/year).
Step 2: Sign up to a hosting provider
Now that you’ve secured your domain name, it’s time to locate a Web Hosting company.
Every website requires some form of hosting. It’s like renting a piece of online real estate — just make sure you choose a patch with lots of room to expand!
When it comes to deciding on the finest hosting company and the sort of hosting you want, you must consider the type of shop you are creating.
One thing we will suggest is that shared hosting should be avoided. When you share a server with other websites, if one of them is hacked, it leaves your site susceptible as well. This is just not worth the risk when dealing with people’s credit card information.
We recommend starting with one of WooCommerce Hosting or WordPress Hosting plans, whether you’re just getting started with a few goods or envision your business expanding in the near future. WooCommerce and WordPress Hosting plans from F60 Host aren’t simply specialised eCommerce powerhouses; they’re also designed to make your life simpler. They start at the best price including one-click payment processing and a storefront theme that is automatically deployed. You’ll be able to sell an endless number of things as well.
Step 3: Install WordPress
There are two main ways to install WordPress:
- ‘One-click’ install through your hosting dashboard
- Manually downloading WordPress, then uploading it to your hosting account
‘One-click’ WordPress installation
As you would think, the first choice is the most straightforward, and it’s the one we recommend. When picking a hosting company, search for those that provide ‘one-click’ install — for a list of the best, see our list of the top WordPress hosts.
Step 4: Install and configure WooCommerce
The most popular WordPress plugin for adding eCommerce features to your site is WooCommerce. It has over 4 million active installations and a 4.6/5 rating from over 3,000 users. It’s safe to say it’s rather popular, and it’s understandable.
For starters, it’s completely free. WooCommerce, like WordPress, is an open-source platform created by a community. While certain ‘extensions’ (such as the ability for clients to book appointments) may need a fee, you may transform your website into an online store without costing a dime. That includes:
- Product pages
- Cart and checkout
- Secure payments
- Shipping options and label printing
- Automated tax calculations
- Integration with Google Analytics, Facebook, MailChimp etc.
Step 5: Choose a theme
Your ‘theme‘ will serve as the foundation for all of your website’s content. The beauty of WordPress is that it allows you to completely customize your site — you might easily wind up with something that looks nothing like the initial design by modifying or adding to the HTML code.
Unless you’re a coding genius who craves total customization, it’s best to pick a theme that appears as near to your intended end result as feasible.
To put it another way, choose a theme that you enjoy and will function well for your eCommerce site, even if it involves paying for a premium design from a third-party site. It will save you time and effort in the long run!
Step 6: Add products
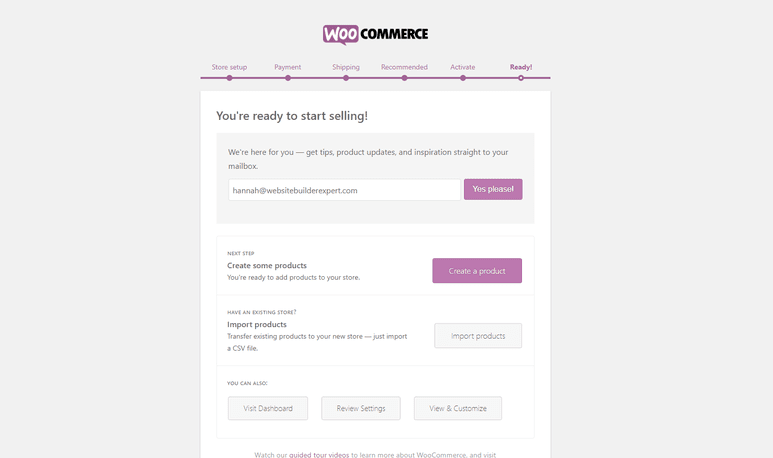
You’ll see a screen encouraging you to add your first product once you’ve installed Jetpack, which is the final step in your first WooCommerce setting.
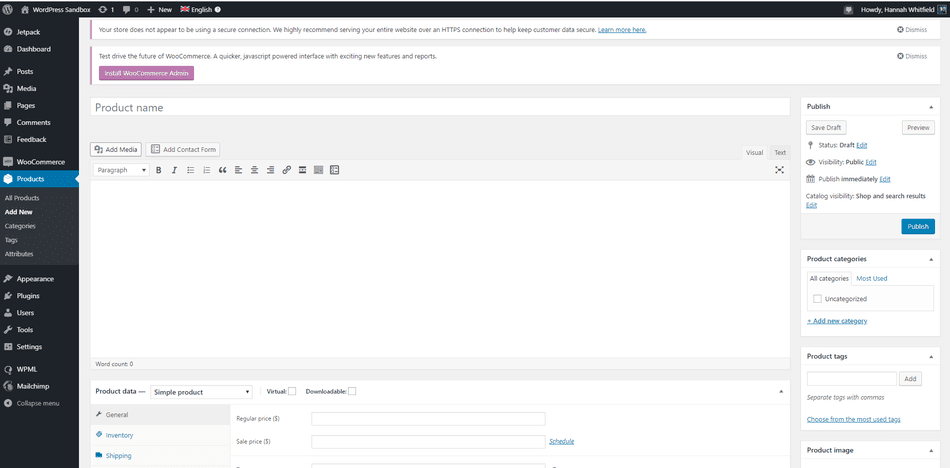
If you’re not ready to upload yet, that’s fine. When you return to your dashboard, just go to ‘Products’ down the left hand side, then ‘Add New’:
For every product you upload, you’ll need the following things:
- Product name – e.g. Cute Pale Grey Cement Plant Pot
- Price – e.g. $10.95
- Main product image – this should be a picture of the whole product, from the front
- Additional product images (optional, but recommended) – include pictures from as many different angles as possible, and add closeups of finer details
- Product description (long) – e.g. ‘Inject some Scandinavian cool into your home with this simple cement planter. Features a drainage hole and comes with small matching dish, so your plant won’t get over-watered. Height: 15cm. Diameter: 8cm.’
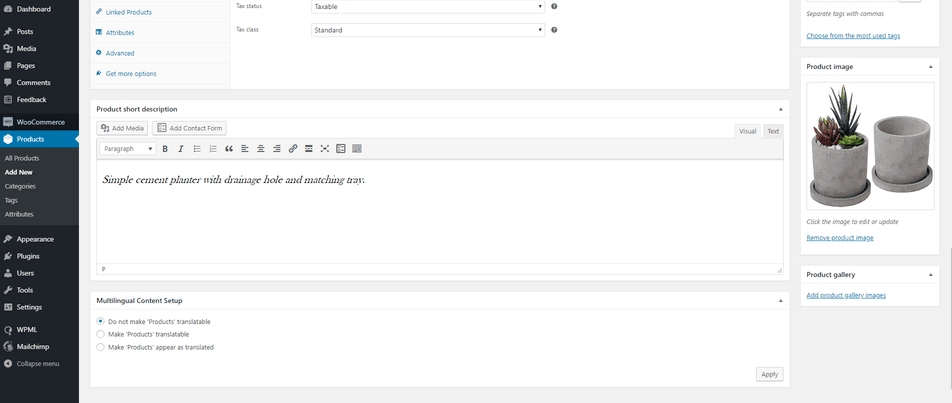
- Short product description – e.g. ‘Simple cement planter with drainage hole and matching tray.’
- Product category (if you have more than one)
How you add products to your site depends on the type of product you’re adding. There are six main types:
- Simple
- Grouped
- External/Affiliate
- Variable
- Downloadable
- Virtual
WooCommerce has an excellent, detailed guide explaining what each product type means, and how to go about uploading each type.
You can see how we’ve filled this screen with all of the data we mentioned before. On the right hand side, notice how we’ve put this product to the ‘Plant containers’ category. We simply chose ‘Uncategorized’ and then clicked ‘+Add new category,’ which is highlighted on the right. We then titled and selected our new category, then unselected ‘Uncategorized.’ We’d include additional photographs of our gorgeous plant pot in the ‘Product gallery‘ area below the main image if we had them.
Once you’ve added this key information, you’ll need to click through all the tabs in the middle to add all the specific details of your product. Here’s a quick overview of what’s covered in every tab of the product data section:
- General – this is the tab we’re in currently, and covers price and tax
- Inventory – the place to add SKUs etc. if you want to be able to track your inventory
- Shipping – product dimensions and shipping cost
- Linked products – update later with complementary products to upsell
- Attributes – if you have a variable product (one with different sizing or colour options, for example), then this is the place to add the different versions
Step 7: Install additional plugins
Alongside WooCommerce, here are three plugins we really rate for online stores:
1. Yoast for SEO guidance
It won’t matter if you have the finest internet shop in the world if no one can discover it! Enter Yoast SEO, a useful plugin that will assist you in climbing the search engine ranks, giving you the best opportunity of landing on page one. SEO stands for search engine optimization, and it entails making minor modifications to your website in order for search engines to better ‘read‘ and ‘understand‘ your material and, as a consequence, ‘prioritise‘ it.
2. Securi for security
When it comes to accepting card payments on your website, the risks are significantly bigger. While there are free security plugins (such as Wordfence) available, we believe this is an area where a little additional money is worth it. Securi plans, and to use it, you’ll need to download and install the free plugin from the WordPress directory.
P.S. – This should go without saying, but safeguarding your website is critical. So don’t put it on the “too difficult” list; instead, use our comprehensive tutorial to learn how to protect your WordPress website.
3. Site Reviews for reviews
Social proof has been demonstrated to be one of the most crucial aspects in persuading consumers to do the desired action – in this example, purchasing your items. Customers will be able to post reviews on your site when you install Site Reviews.
Adding plugins to your site is super simple:
- Log in to your WordPress dashboard.
- Head to ‘Plugins’, then ‘Add New’.
- Use the search bar in the top right hand side to search for specific plugins, or the general feature you’re looking for.
- Once you’ve found one you like the sound of, look at its reviews and ratings to check it seems trustworthy.
- Once you’re happy with your choice, hit the ‘Install Now’ button.
- Once WordPress has finished downloading the plugin, you’ll get a completion message, and be prompted to click ‘Activate Plugin’.
- Next, head to settings to configure your plugin – each one will have a different process for this, but should have instructions in the plugin description.
Step 8: Add content that converts
It’s now time to tweak the copy on your most important pages. Go to ‘Pages‘, then ‘All Pages‘ to find these important pages.
We’ve put up a comprehensive guide on writing for the web, including guidance from copywriting pros — be sure to check it out!
1. Microcopy
Microcopy, also known as ‘UX copy,’ refers to the little bits of navigational copy, error warnings, and ‘calls to action’ on your website (CTAs).
This is the most crucial material on your website, word for word. It leads customers around your site and reassures/persuades them at important times (like when they’re ready to give you money).
2. Product descriptions
These should be brief yet informative – and, as the name implies, descriptive. Consider everything you’d want to know about the product if you were buying it for yourself, especially aspects that aren’t obvious from the product photographs. Separate the content into bullet points, and keep the formatting and information similar throughout all products.
3. Product images
Your product photographs‘ quality may make or break your website. For the greatest results, use a high-quality camera and a plain background. ‘The more product photographs, the better,’ is a basic guideline. Keep your product photos constant, much like your descriptions, for a clean-looking website.
4. Privacy Policy
Before making your site public, WordPress will really prompt you to choose a privacy policy page. Fortunately, you may use a template to help you get started.
Go to ‘Settings,’ then ‘Privacy,’ and then ‘Check out our tutorial.’ Once that’s done, simply choose the appropriate page from the dropdown menu below.
9.Make your site public
It’s time to make your site public if you’re mostly satisfied with how it works (remember, you can always ‘Preview’ pages to see how they’d appear live).
This is the most straightforward part!
Select ‘Privacy‘ from the ‘Settings‘ menu. You should be able to set your site ‘Public‘ once you’ve submitted your privacy policy.
More information:
To read more articles on Google G Suite/Workspace domains, Server, Hosting check out these F60 Host resources:


