How to Integrate Google Analytics in weForms

The Google Analytics module is one of the most useful things you can add to your weForms. After you’ve enabled the module, you’ll be able to measure and analyse website traffic as well as campaigns related to your forms. To activate the Google Analytics module in weForms, follow the instructions below.
- Activate Google Analytics Module
- Configuring Google Analytics in weForms
- Adding the Tracking ID
- Enabling Google Analytics on a Form
How to Enable Google Analytics in WeForms
- Login to the WordPress Administrator
- Click on weForms
- Click on Modules
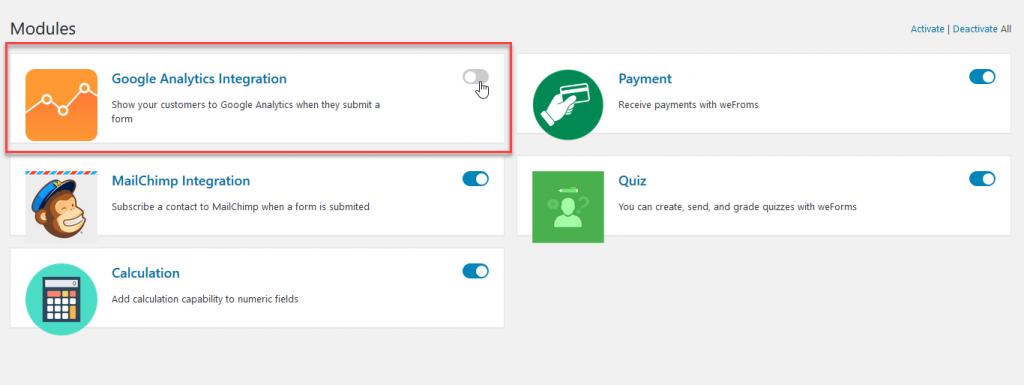
- Find the Google Analytics Integration module and then click on the slider to enable it
The WordPress site will provide a green box message to confirm the module’s activation, and then it will save the update automatically. In the screenshot below, you can see the module and slider:

If you’re searching secure, optimized server for your WordPress site, then check out F60 WordPress Hosting.
Configuring the weForms Google Analytics module
After you’ve enabled the module, you’ll need to add the tracking ID and then activate it on the form. Complete the necessary configuration for Google Analytics to track your form by following the instructions below.
Add the tracking ID for Google Analytics.
You must have a Google Analytics account in order to add the tracking ID. Go to Google’s Analytics Help page to learn how to make one (the page is also linked in the Google Analytics tab). They provide detailed instructions on how to create an account and obtain your tracking ID.
- Get you Tracking ID from Google
- Log in to the WordPress Administrator Dashboard
- Click on weForms, then click on Settings
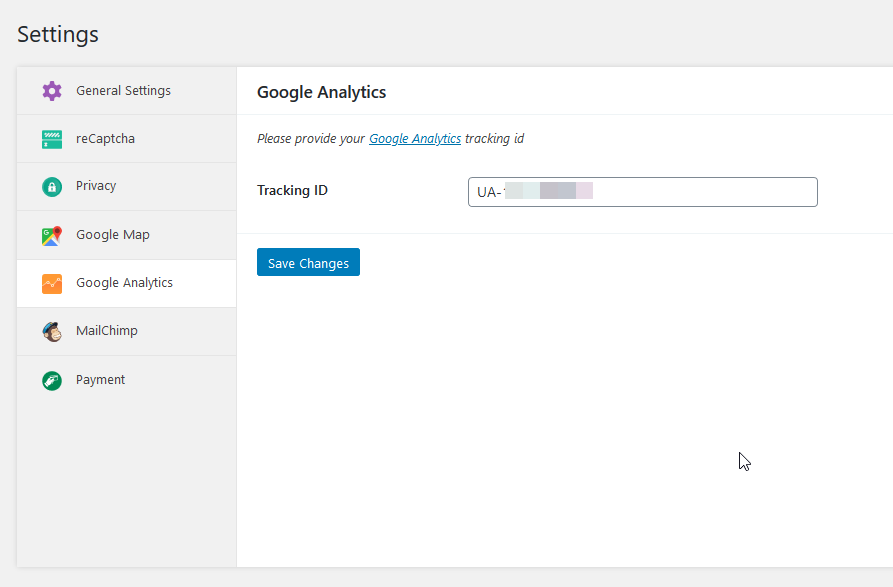
- Click on the Google Analytics tab
- Add the Tracking ID that you copied in step 1
- Click on the Save Changes button

Google Analytics Tracking ID is added to the weForms Settings page.
The next step is to turn on the form or forms that you’re using Google ID to track.
Using Google Analytics to Monitor a Specific Form
- Login to the WordPress Administrator (if you’re not already in it)
- Click on weForms
- Click on All Forms
- Select the form(s) that you want Google Analytics to track. Click on the form title or click on the Edit link in order to edit the form
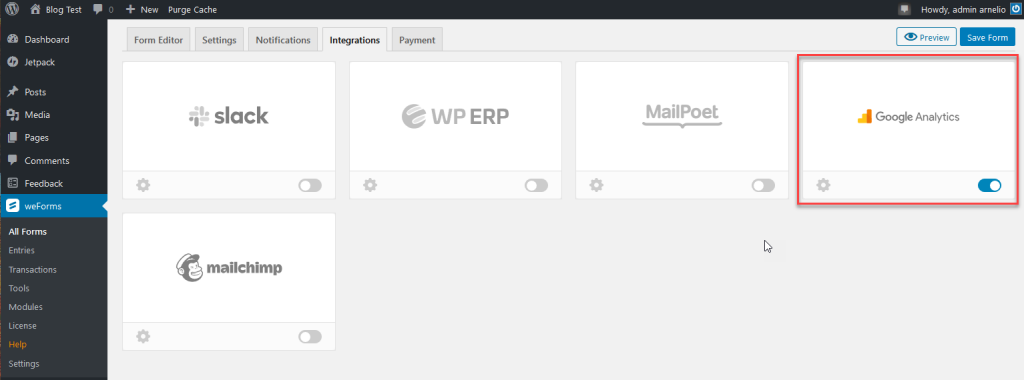
- At the top of the form, you’ll see the Integrations tab. Click on this tab
- Find the Google Analytics module, then click on the toggle to activate it
- Click on the Save Form button in the top right corner to save your changes
This completes the setting steps required to allow Google Analytics tracking of your form. The Google Analytics module is enabled on the form’s Integrations tab, as shown in the screenshot below.

Congratulations! You’ve finished our guide on how to track your weForms form with Google Analytics. Please see the weForms Product Guide for additional information.
