
How to Enable a WordPress SSL

Enable a WordPress SSL in a Simple Way
We’ll show you how to setup WordPress SSL in this article so you may access to your website safely using an SSL certificate. An SSL Certificate is one method for securing your WordPress site. Check out the various advantages that WordPress Hosting by F60 Host offers, and host your personalised website in an environment that has been designed for maximum security.
An SSL Certificate is required before attempting to complete this guide.
Steps of Enabling your WordPress SSL
- Log into the WordPress Dashboard.
- Roll your mouse over Settings in the navigation menu, then click General.
- In the WordPress Address (URL) field, enter your https address.

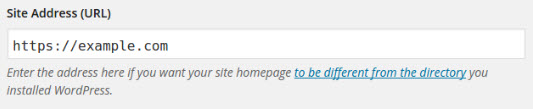
- Enter your https address in the Site Address (URL) field. WordPress advises that you enter the address here if you want your site homepage to be different from the directory you installed WordPress.
- Click the Save Changes button on the bottom of the screen. When the changes have been saved you will see a confirmation message.
Keep in mind that the SSL Certificate you’re using is only valid for your site’s URL. If you have any media assets or coding references on your site that reference a non-secure URL, your site will be flagged as insecure. When there are unsafe references on your site, the padlock icon in the address bar will not show as green or locked, which is a common detection in internet browsers. There are a number of web services that can check your site to see if it’s vulnerable. Why No Padlock?, for example, can be used to check for insecure links on your website.
Now that you know how to enable SSL in WordPress, congrats! You can now use an SSL connection to connect to your WordPress site.