
5 Ways to Verify Your Site with Google Search Console
Google Site Verification: Verify Your Site with Google Search Console
Google Search Console is a tool that provides reports on how your site is indexed and performing in Google Search properties. There is frequently confusion about the differences between Google Analytics and Google Search Console. I like to put it like this:
- Google Analytics: shows you what users are doing on your site
- Google Search Console: shows you how search engines are seeing your site
Google site verification is the process of confirming that you own the site. As a result, you must complete the Google Search Console authentication process before managing your sites through Google tools.
The process is rather simple, and there are several methods for verifying your website with Google Search Console. This article will go over 5 various Google site verification methods, including manual approaches
5 ways to verify your site with Google Search Console
Here are the 5 different ways to verify your site with Google Search Console
1. Verification with DNS record
If you want to use the Domain method to validate your website, you’ll need to add a TXT record to your domain’s DNS settings. This is how the verification window appears:
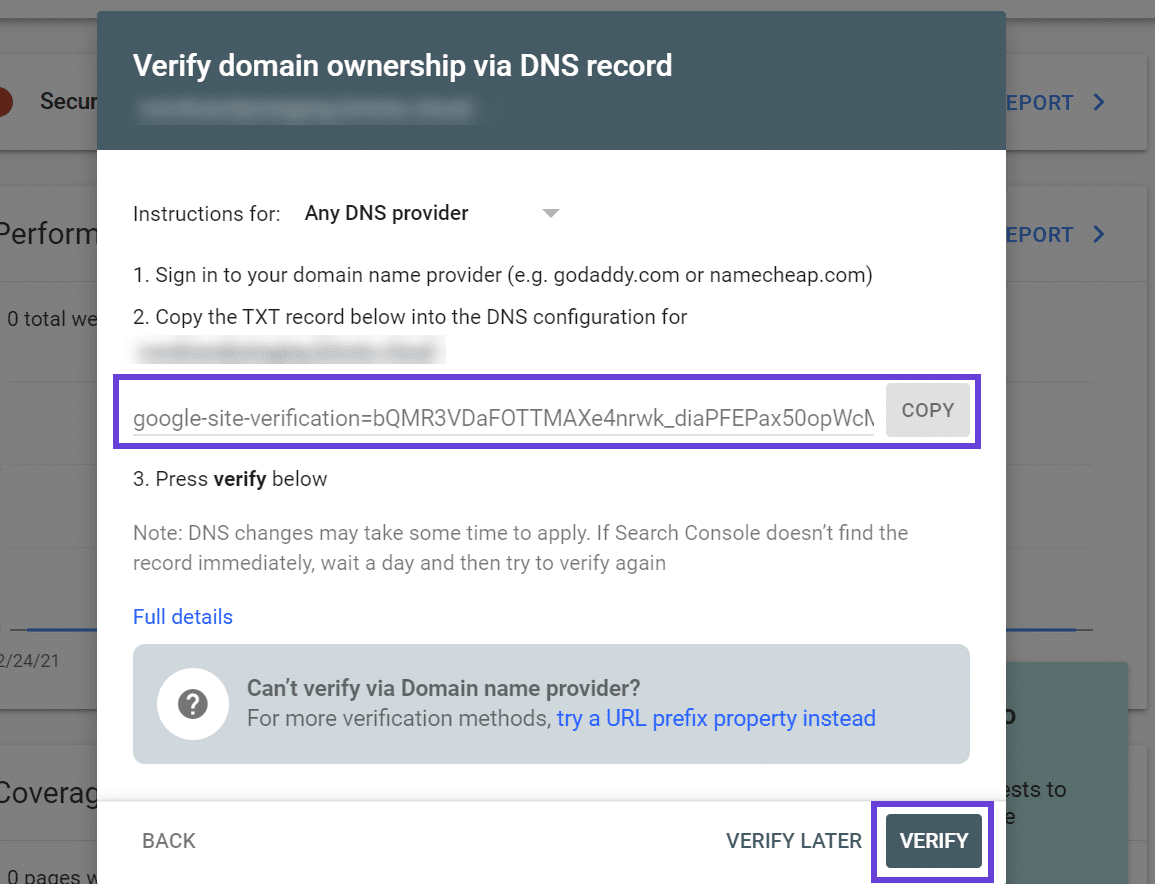
Simply copy the text file from the instructions and paste it into the TXT record of the domain you wish to track. Save the DNS configuration with the TXT record inserted and wait up to 15 minutes for the modifications to take effect.
Once some time has passed, click “Verify.”
2. HTML Verification File
This method requires you to upload an HTML file to your website’s root directory. It’s simple, but you’ll need access to your server to upload the file, either through FTP/SFTP clients or something like cPanel File Manager.
Step 1: Download the Verification File
After you add your site to Google Search Console, you should see an option to download an HTML verification file in the Recommended verification method tab:
Download a verification file from Google Search Console.
Click on the button next to Download the file. Save this file somewhere you’ll remember — you’ll need it in a minute.
Step 2: Upload the File via SFTP
Once you’ve successfully connected, upload the file that you downloaded from Google to the root folder of your site (this is the folder that contains the wp-content folder, wp-config.php, etc.)
Upload verification file via FTP/SFTP.
Once the file is in your site’s root folder, return to Google Search Console. It’s time to verify your property.
Step 3: Click the Verify Button in Search Console
Once you’ve uploaded the file to your site, go back to Google Search Console and click on the VERIFY button to complete the process. Google Search Console will locate the file on your server and verify that you own the website.
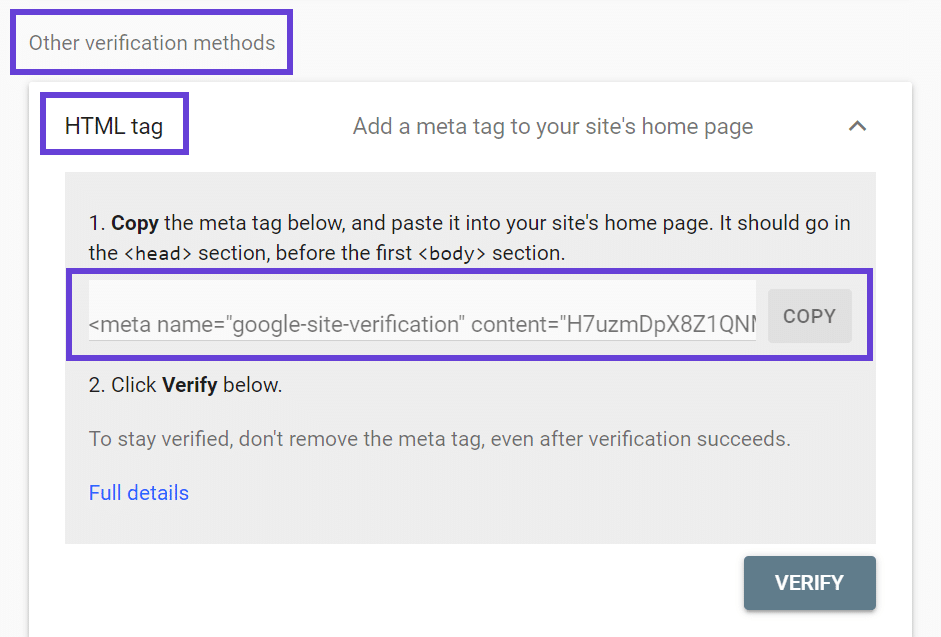
3. HTML Tag
To proceed with the verification with a meta> tag to the HTML code, we need access to alter the home page source code: it all starts with the URL prefix selection, but in this case GSC supplies a tag with a special key tied to a specific user.
The string must be copied and then pasted into the home page’s HEAD> element, and we can see if the addition was successful directly from the source text; in this case, too, the verification would be immediate if done correctly.
4. Verification with Google Tag Manager
If you have a Google Tag Manager account, you can verify site ownership using a code of the container snippet: before anything else, you need permission to publish on the Google Tag Manager container, as well as having to login to Search Console with the same account and check that our home page has the noscript> part of the Tag Manager code right after the opening body> tag.
The procedure is the same as before: open the GSC, click on a new property, and input the URL in the URL prefix. If you have all of the required permissions, the verification will happen immediately after you click. As with Analytics, we are not integrating the accounts of the two Google products here, merely making verification easier.
5. Verifying the site with Google Analytics monitoring code
To proceed with the verification via a Google Analytics monitoring code, we must first utilise the same associated Google account or have the permission to update related to the web property we are working on. Furthermore, we must ensure that the Google Analytics monitoring code is present in the home page’s head area (not in the body one, even if still effective with Analytics).
The system proceeds in the same manner as in previous cases: click on add property, select URL prefix, and input the address, which is subsequently linked to Analytics. Except for errors, verification is immediate, and the film stresses that the verification is not done to gain access to the Analytics data.
Which Method Should You Use?
It takes only a few seconds to add a website to Google Search Console. However, it would be advantageous if you proved that you own the site, which can vary in difficulty based on the technique you choose.
You already have some Google code on your site if you use Google Analytics or Tag Manager. Google Search Console should identify that code and verify your website without you having to do anything more. You can also include an HTML file, a tag, or utilise DNS verification (the ideal option if you don’t want to add more code to your site).
These are the 5 easy ways to verify, and there are a variety of ways in which you can verify your website with Google Search Console.