
How to Use WordPress Forms Lite on Your Website: A Comprehensive Guide
In today’s digital landscape, creating interactive and user-friendly forms on your website is crucial for engaging visitors and achieving your business goals. That’s where WordPress Forms Lite comes into play. This powerful plugin revolutionizes the way you create and manage forms, offering a wide range of benefits that enhance both the functionality and user experience of your website.
Why is WordPress Forms Lite important in website development?
Simplicity and Ease of Use:
WordPress Forms Lite boasts an intuitive interface that makes form creation a breeze, even for those without coding knowledge.
Dynamic Form Fields:
With WordPress Forms Lite, you have a plethora of form fields at your disposal. From text inputs and checkboxes to dropdown menus and file uploads, you can select the fields that best suit your needs.
Enhanced User Experience:
A seamless and enjoyable user experience is vital for encouraging form submissions.
Integration Made Easy:
WordPress Forms Lite offers seamless integration options, making it effortless to incorporate forms into your website.
Advanced Features and Add-Ons:
You can leverage conditional logic to show or hide specific form fields based on user responses, tailoring the form experience to individual users.
The purpose of this blog post is to guide you through the step-by-step process of effectively using WordPress Forms Lite.
By harnessing the power of WordPress Forms Lite and following our step-by-step guide, you’ll unlock the potential to create dynamic, user-friendly forms that elevate your website’s interactivity and drive meaningful engagement. So, let’s get started on this exciting journey of form creation with WordPress Forms Lite!
Installing and Activating WordPress Forms Lite
One of the first steps towards harnessing the power of WordPress Forms Lite is to install and activate the plugin on your website. In this section, we’ll provide you with clear, step-by-step instructions to get you started on the right path. We’ll also highlight some recommended settings and configurations for optimal performance.
Installation:
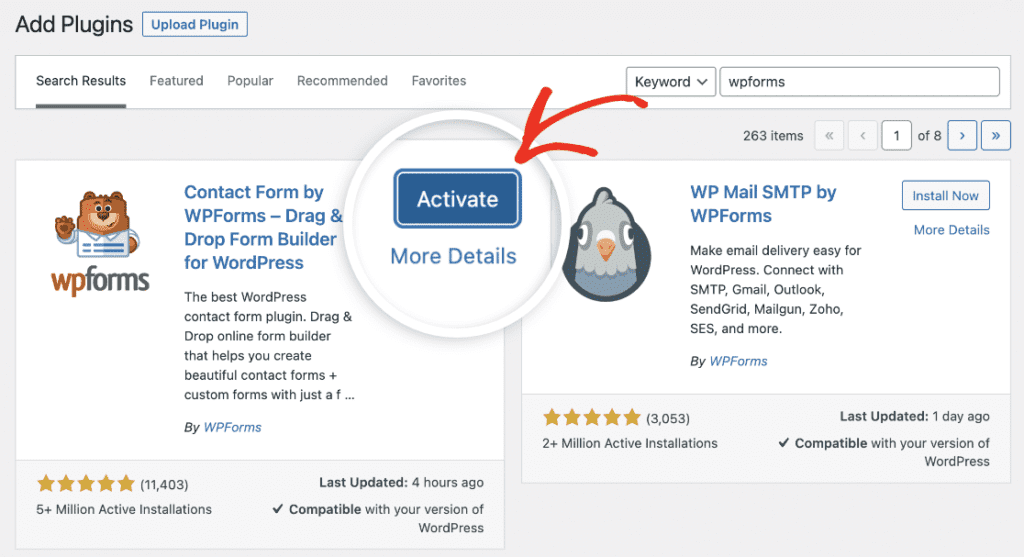
To begin, log in to your WordPress dashboard. From the left-hand menu, navigate to “Plugins” and click on “Add New.” In the search bar located at the top right corner, type “WordPress Forms Lite” and hit enter. Look for the plugin in the search results, and once you find it, click on the “Install Now” button.
Activation:
After the plugin is successfully installed, click on the “Activate” button to activate WordPress Forms Lite. You will be redirected to the Plugins page, where you can see the plugin listed among your active plugins.
Accessing Plugin Settings:
To access the settings for WordPress Forms Lite, go to your WordPress dashboard and look for the “Forms” tab in the left-hand menu. Click on it, and you will see a dropdown menu with various options. Select “Settings” from the list.
General Settings:
In the General Settings section, you’ll find a range of options to configure the plugin according to your preferences. It is recommended to review and adjust the following settings:
- Email Settings: Set up the email address where you want to receive form submissions. Ensure it is a valid and regularly checked email to avoid missing important messages.
- Form Validation: Enable form validation to validate user inputs and prevent invalid or incomplete submissions.
- Spam Protection: Enable the built-in spam protection feature to minimize spam submissions. You can choose from options like reCAPTCHA, honeypot, or a combination of both.
Additional Settings:
WordPress Forms Lite offers additional settings to further customize your forms and optimize performance. Take a look at the following options:
- Confirmation Messages: Customize the messages displayed to users after they submit a form. You can provide a simple thank-you message or redirect them to a specific page.
- Styling Options: Explore the styling options to match the forms with your website’s design. Customize colors, fonts, and layouts to ensure a cohesive visual experience.
- Advanced Settings: If you’re comfortable with advanced configurations, delve into this section to fine-tune form behaviors and functionalities. However, it is advisable to proceed with caution and only modify settings if you have a clear understanding of their implications.
Remember to save your changes after adjusting the settings to ensure they take effect.
By following these step-by-step instructions, you can seamlessly install and activate the WordPress Forms Lite plugin on your website. Accessing the plugin settings allows you to configure essential options to optimize its performance and align with your specific requirements. Take the time to review and adjust recommended settings to ensure your forms function smoothly and provide the best user experience possible.
Creating a New Form
WordPress Forms Lite empowers you to create custom forms that suit your unique website needs. In this section, we’ll guide you through the process of creating a new form using WordPress Forms Lite. We’ll explore how to select form fields and customize their settings, allowing you to unleash your creativity and build engaging and interactive forms.
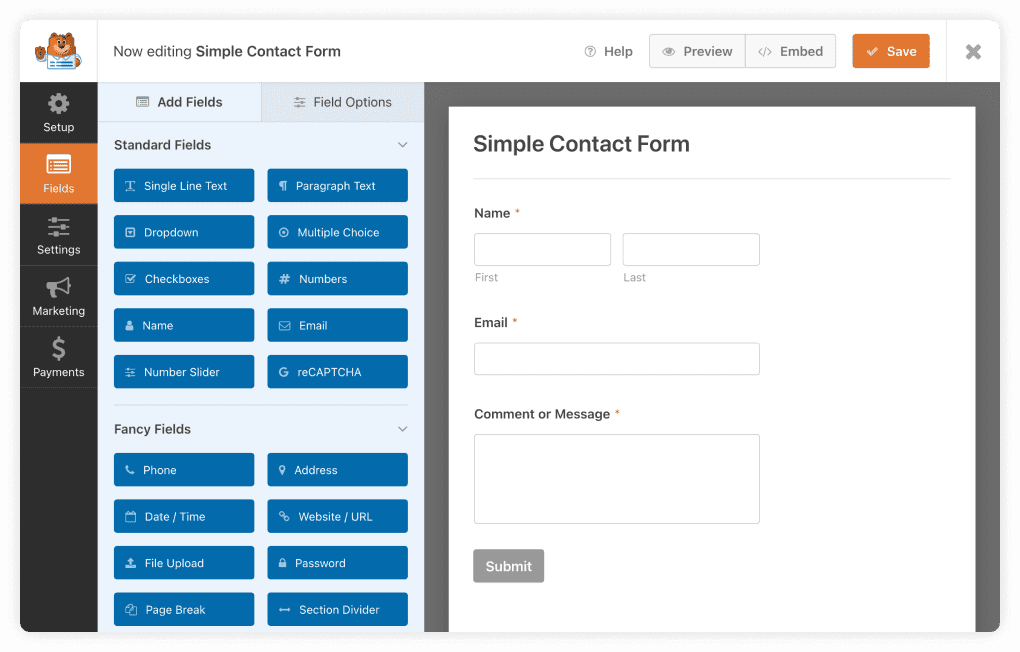
Accessing the Form Builder:
To begin, log in to your WordPress dashboard and navigate to the “Forms” tab on the left-hand menu. Click on it, and you will see a dropdown menu. Select “All Forms” to view your existing forms or click on “Add New” to create a new form from scratch.
Selecting Form Fields:
Once you’re in the form builder, you’ll notice a sidebar with a variety of form fields to choose from. WordPress Forms Lite offers a wide range of options, including text inputs, checkboxes, radio buttons, dropdown menus, file uploads, and more.
To add a form field, simply drag and drop it onto the form canvas. Position it where you want it to appear within the form layout. You can rearrange the fields by clicking and dragging them to the desired position.
Customizing Field Settings:
After adding a form field, you can customize its settings to tailor it to your specific requirements. Click on the field to access its settings. Here are some key settings you can consider:
- Label: Enter the label or question that will be displayed alongside the form field. Make it clear and concise to guide users effectively.
- Required Field: Toggle the “Required” option if the field must be filled out by users before they can submit the form. This ensures essential information is captured.
- Placeholder Text: Provide placeholder text within the form field to give users an idea of the expected input format. For example, you can use “Enter your name” or “Your email address” as placeholders.
- Field Options: Some form fields, such as radio buttons or dropdown menus, require you to provide options for users to select from. Add the available options, each on a separate line, in the field options settings.
Adding and Customizing Additional Fields:
Continue adding form fields to your canvas by dragging and dropping them as needed. Customize each field’s settings based on the information you want to collect from users. Feel free to experiment with different field types and configurations to create a form that meets your specific needs.
Saving and Previewing the Form:
As you progress with building your form, remember to save your changes regularly by clicking the “Save” button. This ensures that your progress is securely stored.
To preview the form and see how it will appear to your users, click the “Preview” button at the top of the form builder. This allows you to review the form’s layout, field arrangement, and overall appearance.
Designing and Styling Forms
Aesthetics play a significant role in creating a delightful user experience on your website. With WordPress Forms Lite, you have the flexibility to customize the appearance of your forms to align with your brand identity and engage your audience visually. In this section, we’ll explore the options available for customizing the appearance of your forms and enhancing their visual appeal.
Styling Options:
WordPress Forms Lite offers a range of styling options to ensure your forms seamlessly integrate with your website’s design. To access these options, navigate to the form builder and click on the “Form Settings” tab located at the top of the page. Here, you’ll find various customization options:
- Form Width: Adjust the width of your form to optimize its display within your website layout. You can choose a fixed width or a percentage-based width, depending on your preferences.
- Background Color and Image: Customize the background of your form by selecting a specific color or uploading an image. This allows you to create a visually appealing backdrop that matches your brand’s aesthetics.
- Font Styling: Tailor the font style, size, and color of your form’s text elements to enhance readability and align with your website’s typography.
- Button Design: Customize the appearance of your form’s submit button to make it more visually appealing and enticing for users to click. Adjust the button’s color, text, and hover effects to create a cohesive and engaging form experience.
Form Layout:
WordPress Forms Lite provides options to customize the layout of your forms for optimal display. Within the form builder, you can access the “Form Layout” tab to configure settings such as:
- Field Width: Specify the width of individual form fields to create a well-balanced and visually pleasing form layout. You can adjust the width of each field individually or set a uniform width for all fields.
- Field Alignment: Choose whether to align your form fields to the left, center, or right within the form layout. This allows you to create a visually structured and organized form design.
Responsive Design:
In today’s mobile-centric world, it’s crucial to ensure that your forms look and function seamlessly across different devices and screen sizes. WordPress Forms Lite offers responsive design options that automatically adapt your forms to fit various devices. This ensures that your forms retain their visual appeal and functionality, whether accessed on a desktop, tablet, or smartphone.
Previewing Your Form:
To see how your customized form will appear to users, click the “Preview” button at the top of the form builder. This allows you to review the visual changes you’ve made and make any necessary adjustments before publishing the form on your website.
Publishing and Integrating Forms
Once you’ve created a captivating form using WordPress Forms Lite, the next step is to publish it on your website, making it easily accessible to your audience. In this section, we’ll provide you with a step-by-step guide on how to publish your forms, ensuring they are prominently displayed on your website for users to interact with.
Embedding Forms:
WordPress Forms Lite offers an easy and efficient method of embedding forms directly into your website’s pages or posts. To do this, follow these steps:
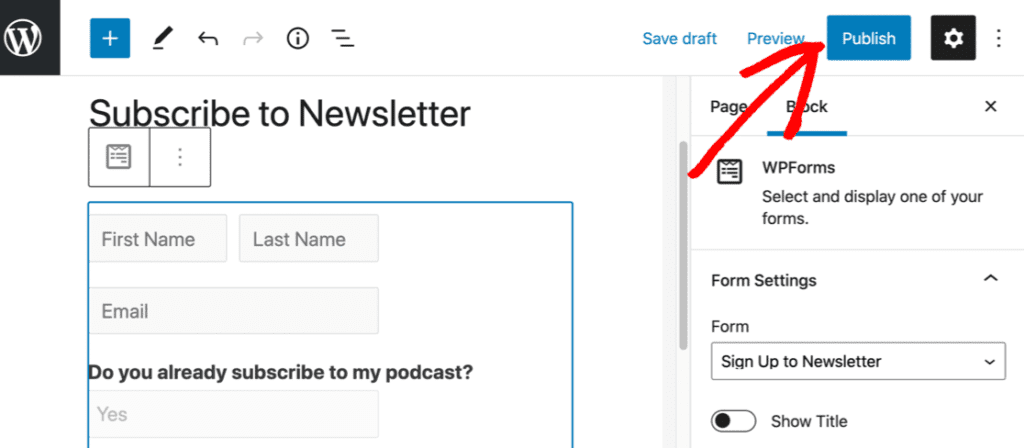
- Edit the page or post where you want to display the form. Look for the “Add Block” button or the “+” symbol to add a new block.
- Search for the “Forms” block or locate it under the “Widgets” category. Click on it to insert the block into your page or post.
- Once the Forms block is added, you’ll be presented with a dropdown menu to select the form you want to display. Choose the appropriate form from the list.
- Save or update your page or post, and the form will be embedded and displayed on the live version of your website.
Sidebar Widget:
If you prefer to showcase your form in a sidebar, WordPress Forms Lite also provides a convenient widget option. Here’s how to use it:
- From your WordPress dashboard, navigate to “Appearance” and select “Widgets.”
- Locate the “Forms” widget and drag it to the desired sidebar area.
- Configure the widget settings by selecting the form you want to display and providing a title if desired.
- Save the widget, and your form will now appear in the designated sidebar area on your website.
Customizing Form Display:
WordPress Forms Lite offers additional display options to fine-tune the appearance and behavior of your forms. To access these settings:
- In the form builder, click on the “Form Settings” tab and navigate to the “Display Options” section.
- Here, you can choose to show or hide the form title, description, and labels. You can also enable AJAX submission, which allows users to submit the form without a page reload.
- Make the desired selections based on your preferences and the specific requirements of your form.
Previewing and Testing:
Before making your form live, it’s crucial to preview and test it to ensure it functions as expected. Use the preview functionality within the form builder to see how the form appears and behaves on your website. Test the form by filling it out and submitting it, checking that you receive the form submissions as intended.
Unlocking the Potential: Harnessing the Power of WordPress Forms Lite
WordPress Forms Lite is more than a form plugin. It empowers you to build effective, interactive, and user-friendly forms on your website. With its user-friendly interface, you can create customizable forms without coding expertise. Customize the appearance, layout, and functionality to streamline the user experience. Collect and manage form submissions efficiently, gaining valuable insights for decision-making.
Integrate with other tools like email marketing and CRM systems for automation. Continuously explore new features and experiment to keep your forms fresh and effective.
WordPress Forms Lite enhances your website’s functionality and helps you achieve your goals.
Want to know more? Then follow us at F60 Host